Experian integration
Use the Experian integration for identity proofing. For more information about this integration, see Identity proofing.
To complete this guide, you must have Experian account credentials.
Integrate Experian
This guide describes how to integrate Experian with Rebilly.
1. Connect an Experian account to Rebilly
This process describes how to connect your Experian account to Rebilly.
- In the left navigation bar, click App store, then click Experian.
- Click Add Experian credentials.
- Enter your: username, password, HMAC key, and public key.
- Click save.
2. Create tags
This step describes how to create tags that will be used to tag your customers based on the result of the Experian check.
- In the left navigation bar, click Settings .
- In the Management section, click Tags.
- Add 3 new tags, one for each Experian result: confirmed, rejected, or unknown. We suggest using the following tags:
experian-confirmedexperian-rejectedexperian-unknown
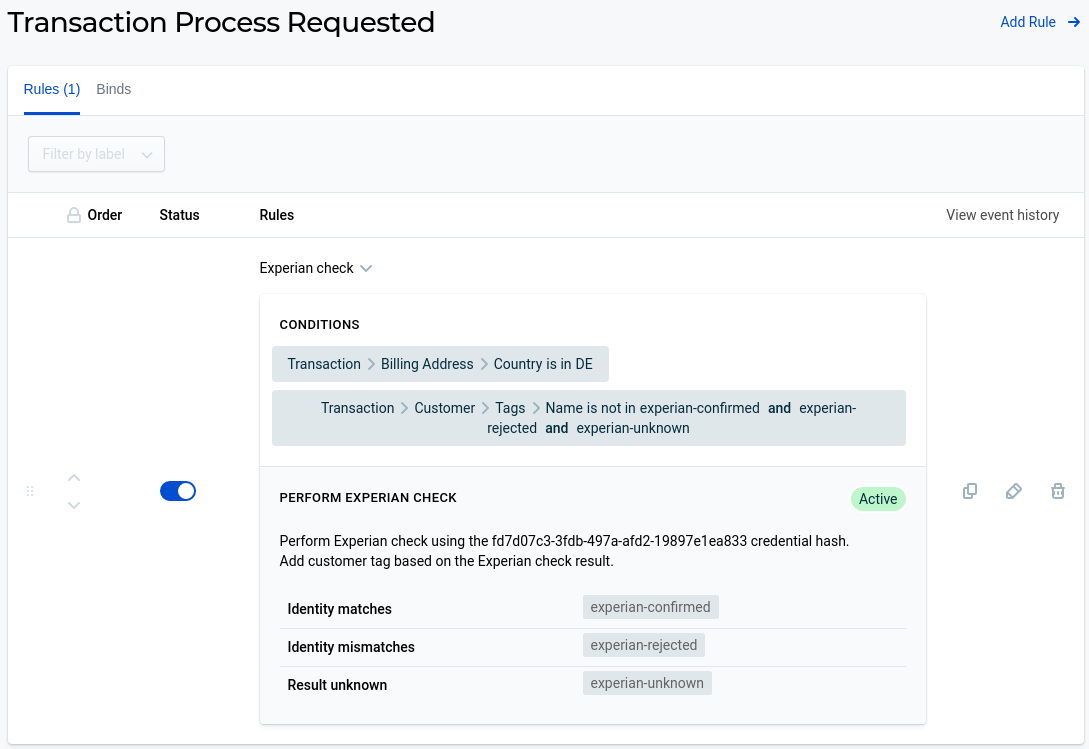
3. Create Experian check rules
This step describes how to create an automation that trigger the Experian check based on the customer's billing address and date of birth, and assigns the corresponding tag based on the result.
- In the left navigation bar, click Automations .
- In the Rules engine section, click Rules engine.
- Click Core events.
- Click the Transaction process requested event.
- Click Rule set, then click Create rule.
- In Name field, enter a name for the rule.
- Clear the Stop further processing checkbox.
- In the Conditions section, clear the No conditions checkbox, and apply the following filters:
- Transaction > Billing address > Country
is inDE - Germany. - Transaction > Customer > Primary Address > Dob
is not empty. - Transaction > Customer > Tags > Name
is not inexperian-confirmedandexperian-rejectedandexperian-unknown.
- Transaction > Billing address > Country
- In the Actions section, click Add action, and select the Perform Experian check action.
- Select your Experian service credential.
- Assign the tags you created in step 2 to each Experian result.
- Click Save rule.
- Adjust the position of the rule to ensure it is executed, and to ensure that this rule does not stop additional rules processing.
4. Create an approval notification
This step describes how to set up notifications for approved Experian check events using webhooks.
- In the left navigation bar, click Automations .
- In the Rules engine section, click Rules engine.
- Click Core events.
- Click the Experian check performed event.
- In Name field, enter a name for the rule.
- In the Conditions section, clear the No conditions checkbox, and apply the following filter:
- Customer > Tags > Name
is inexperian-confirmed.
- Customer > Tags > Name
- In the Actions section, click Add action, and select the Send webhook action.
- Enter your webhook settings, then click Save rule.
To set up notifications for declined or unknown Experian check events, repeat this process and filter for the corresponding tag.
You may use placeholders in the webhook URL, headers, body, or query parameters:
customerIdoutcomereasonerrorCodeerrorMessage
This example of a webhook body uses two placeholders:
{
  "customerId": "{{ customerId }}",
  "outcome": {{ outcome }}
}
For more information, see the Experian check performed event.